
If I want to hold USD, EUR, and GBP while I travel, I need a setup that lets me receive, store, and spend each currency without forced conversion. That helps me avoid bank FX markups of 3% to 5%, dodge extra ATM and DCC costs, and keep income in the same currency my clients use.
Here’s the short version:
- I use a multi-currency account to hold USD, EUR, and GBP in separate balances.
- I share the right local payment details:
- USD: routing number + account number
- EUR: IBAN for SEPA
- GBP: sort code + account number
- I convert money only when I need it, instead of letting each payment auto-convert on arrival.
- I keep fintech accounts for day-to-day use, a bank backup for larger cash balances, and a business account if I’m paid through an LLC or other company.
- I set things up 2 to 4 weeks before departure, switch 2FA away from SMS, and carry two cards on different networks.
- I always pay in local currency and decline DCC, which can add 3% to 7%.
- If my foreign accounts go over $10,000 in total at any point in the year, I check FBAR rules if I’m a U.S. taxpayer.
A weak setup can leak money in small pieces. On $3,000 per month, a 4% FX drag can cost about $1,440 per year. So if I’m getting paid in dollars, euros, and pounds, I want a setup that keeps each one separate until I decide what to do with it.
Quick comparison
| Setup | Best use | FX cost range | Main watch-out |
|---|---|---|---|
| Fintech account | Spending, conversions, getting paid in foreign currency | About 0.4% to 2% | Often not deposit-insured like a bank |
| International bank | Larger balances and backup banking | About 3% to 5% markup | Higher cost for FX |
| Business/entity account | Company income, such as a U.S. LLC | Often around 1% on some non-USD wires | Usually needs company docs and tax info |
So my goal is simple: hold each currency, match it to my bills, and convert in planned chunks instead of on autopilot.
sbb-itb-39d39a6
How multi-currency accounts work for holding and receiving foreign payments
A multi-currency account lets you keep separate USD, EUR, and GBP balances under one account. Each balance stays on its own. So if a client pays you in euros, that money stays in euros until you decide to convert it.
For nomads, that’s the main upside. You can keep payments in the currency they came in, instead of changing everything to dollars the moment it lands.
When you move money from one balance to another, the platform handles the exchange inside the account. In most cases, that means the mid-market rate plus a clear fee. To open and use one of these accounts, you should expect identity checks, proof of address, and source-of-funds checks. If you’re opening a business account, you may also need to provide entity documents.
What local receiving details look like for USD, EUR, and GBP
Local receiving details can help you avoid SWIFT wire fees and cut down on forced conversion when money arrives. Put simply, they make it easier to get paid in the same currency your clients use.
| Currency | Details You Receive | How Clients Pay You |
|---|---|---|
| USD | Routing number + account number | ACH transfer or domestic wire from any U.S. bank |
| EUR | IBAN + SWIFT/BIC | SEPA transfer from any EU bank |
| GBP | Sort code + account number | Faster Payments from any UK bank |
This setup is handy, but the right account still comes down to your travel schedule and where your clients are based.
When holding three currencies beats converting everything to dollars
The day-to-day logic is pretty simple: keep each currency for the spending or payments it’s meant to cover. Hold USD for reserves, keep EUR and GBP for client income or local spending, and convert only when you need to.
That approach can make budgeting easier too. Each balance stays visible on its own, so you can see what you have in each currency without mixing everything together.
Once the basics are clear, the next step is picking the account type that matches your income flow and travel pattern.
Choose the right setup: fintech account, international bank account, or offshore structure
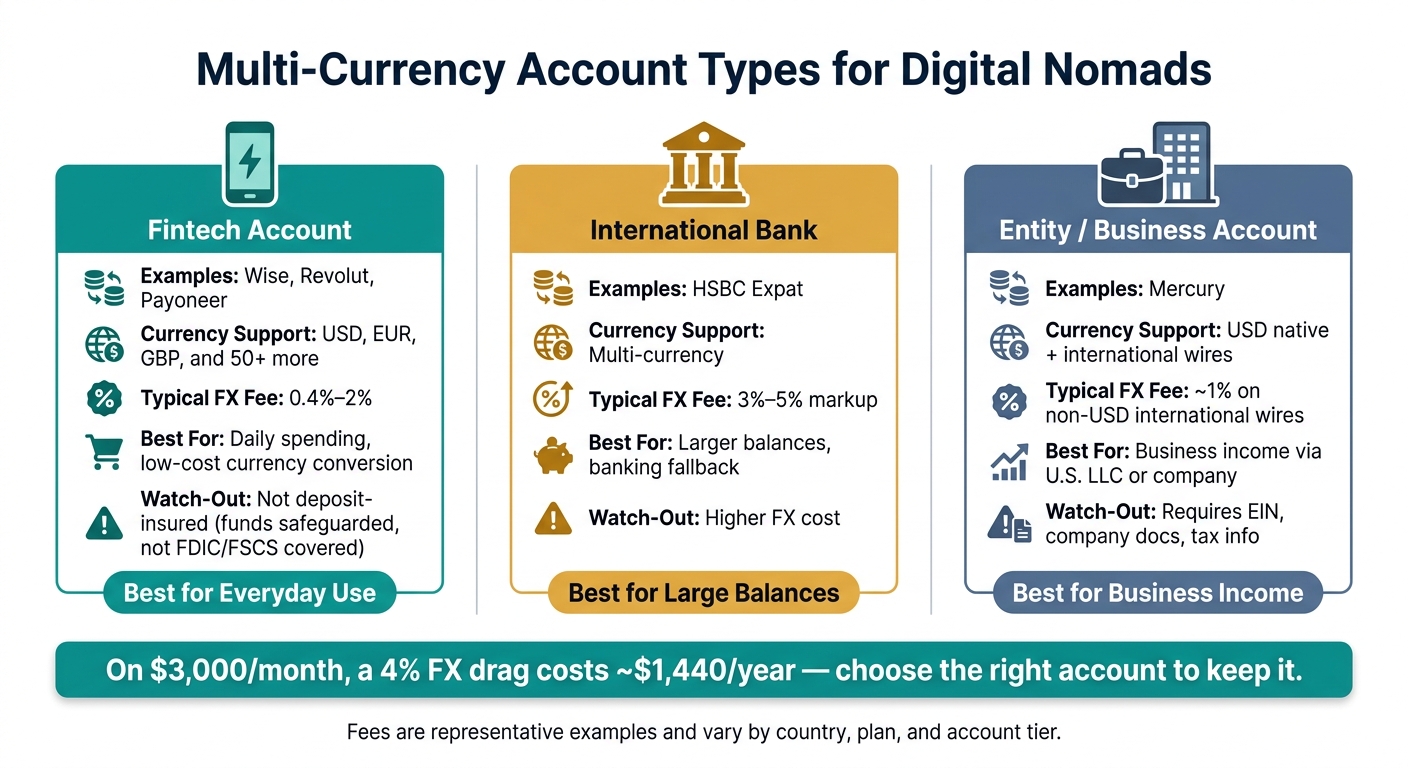
Once you understand how USD, EUR, and GBP balances work, the next move is picking the right account type. In most cases, it helps to split jobs: use one account for spending and another for holding cash. The best setup depends on your income, where your clients pay from, and whether you work through a business entity.
| Account Type | Currency Support | Typical FX Fee | Best-Fit Use Case |
|---|---|---|---|
| Fintech account (e.g., Wise, Revolut, Payoneer) | USD, EUR, GBP, and more | 0.4%–2% depending on platform and plan | Daily spending and low-cost currency conversion |
| International bank (e.g., HSBC Expat) | Multi-currency | 3%–5% FX markup | Higher-balance stability and a banking fallback |
| Entity account (e.g., Mercury) | USD native, with international wires | 1% on non-USD international wires | Business income for U.S.-incorporated entities |
Fees and FX rates are representative examples and can vary by country, plan, and account tier.
Here’s the simple version:
- Use fintech accounts for daily spending and lower-cost conversion
- Use international banks for larger balances
- Use entity accounts for business income
Eligibility matters too. A good account doesn’t help much if your country isn’t supported. Wise is available in roughly 190 countries, while Revolut operates in a narrower set of supported markets. Check access before you build your setup around either one.
Fintech accounts also aren’t meant to hold large balances for long periods. Wise and Revolut are often regulated as electronic money institutions. That means your funds are safeguarded in segregated accounts at partner banks, instead of being covered by FDIC or FSCS deposit insurance. Once your balances move past deposit-insurance caps – $250,000 in the U.S. and £120,000 in the U.K. as of December 1, 2025 – moving extra funds to a regulated international bank can make sense.
Use an international bank when you want more stability for larger balances and a banking backup if your fintech account has a problem. Use an offshore structure only for assets already held through a separate legal entity or trust. Put plainly: offshore structures belong in separate legal or trust holdings, not in the same wallet you use for everyday spending.
If you operate through a U.S. LLC or another entity, business income should go into a dedicated business account, not a personal fintech wallet. Keeping business and personal funds separate helps with clean accounting and compliance.
How to set up USD, EUR, and GBP balances step by step
Once you’ve picked the right account type, the next job is simple: get your USD, EUR, and GBP balances ready before you leave. That way, you’re not dealing with verification issues, card delays, or payment problems from a hotel lobby with bad Wi-Fi.
Open the account and pass verification without delays
Open your accounts 2–4 weeks before departure so there’s enough time for verification and card delivery before you travel.
Most providers will ask for:
- A valid passport
- Proof of address
- A tax identification number
If you’re opening a U.S. LLC business account, you’ll also need your EIN and company registration documents. Wise usually finishes onboarding with video verification in about 10 minutes.
Use a permanent mailing address for financial accounts, like a family member’s address or a mail forwarding service. It also helps to switch two-factor authentication from SMS to an authenticator app before you go. SMS codes often fail when you’re abroad, and that’s a headache you don’t want.
Enable balances, share payment details, and link withdrawal accounts
After approval, turn on each balance and copy the right receiving details for each currency. This part matters more than people think. If you send a client the wrong payment rail, the transfer can bounce or get delayed.
Use the matching local details for each currency:
| Currency | Local Detail Type | Client Instruction | Typical Setup Step |
|---|---|---|---|
| USD | Routing (ACH) + Account Number | "Pay via domestic ACH" | Verify SSN/EIN or passport |
| EUR | IBAN + BIC/SWIFT | "Pay via SEPA transfer" | Enable EUR balance in app |
| GBP | Sort Code + Account Number | "Pay via Faster Payments" | Verify residential address |
It’s also smart to keep one home-country bank account open for refunds, payroll admin, and backup transfers.
Set card and conversion rules before you travel
Set your card and FX rules before departure so you’re not making money calls on the fly.
Most cards pull from the matching currency balance first. If that balance doesn’t have enough funds, they convert from another balance. Revolut adds a 0.5% to 1% markup on currency exchanges during weekends, so it makes sense to convert larger amounts on weekdays.
For cash withdrawals, the terms can vary a lot:
- Wise gives free ATM withdrawals up to $200 per month, then charges 1.75%
- Charles Schwab’s debit card reimburses ATM fees worldwide with no monthly cap
At ATMs and card terminals, always pay in local currency and decline Dynamic Currency Conversion (DCC). DCC can add a 3% to 7% markup. Also, carry at least two cards from different networks so you have a backup if one gets frozen or isn’t accepted.
Control FX costs, protect account access, and stay compliant
Cut conversion losses and manage currency exposure
Once your balances and card rules are set, the next step is when to convert.
A simple way to cut FX costs is to convert only what you need. If a European client pays you in EUR and your rent is also in EUR, leave that money in EUR. When your currency balances line up with your actual spending, you skip extra conversions.
When you do need to convert, do it in batches for planned monthly bills instead of making lots of small conversions during the month. That matters because the fee gap is big. Traditional banks often add a 3% to 5% FX markup, while Wise’s conversion fees for major pairs like USD/EUR usually fall between 0.33% and 0.7%.
That difference can eat into your cash flow fast.
It helps to think of each balance as money set aside for known bills, not money to move around on a whim.
Know the rules on regulation, fund protection, and country restrictions
Lower FX costs don’t mean much if the account no longer works for your residency, tax status, or travel pattern.
Wise and Revolut are EMIs, not banks. They safeguard funds in segregated accounts at regulated banks, but that is not the same as government-backed deposit insurance. By contrast, accounts at FDIC-insured institutions protect up to $250,000, and the UK’s FSCS limit increased to £120,000 per eligible person on December 1, 2025.
That difference matters a lot if you’re keeping large cash reserves.
Eligibility rules can also narrow your options fast. Charles Schwab and Mercury often require U.S.-specific details such as a Social Security Number, EIN, or U.S. address. N26 and Bunq generally require physical EU/EEA residency. Many fintechs also block residents of sanctioned countries, including Iran, North Korea, and Cuba.
In plain English: these rules decide whether you can open the account, keep using it, and avoid sudden disruption when you move countries.
Tax rules matter too. U.S. citizens owe U.S. tax on worldwide income, and FBAR reporting is required if aggregate foreign account balances go above $10,000 at any point during the year.
Then there’s account review risk. Compliance checks can freeze fintech accounts. Things like unusual geographic activity, large undocumented transfers, or routing business income through personal accounts can trigger a review. Keep your passport and proof-of-address files ready so you can get through KYC checks with less hassle.
Conclusion: Build a simple three-currency banking setup that lasts
Receive money in the client’s currency, hold it until you need it, and convert only when you’re ready to spend or pay bills.
If your setup includes a U.S. LLC or an offshore company, account choice becomes a much bigger deal. The wrong mix can create compliance gaps, reporting duties, or tax exposure you didn’t see coming. In that kind of case, getting professional structuring advice before you set everything up is usually worth the time and cost.
A simple three-currency setup works best when you hold each currency until you need it, use accounts that fit your residency and tax profile, and keep a backup banking option in place.
FAQs
How much cash should I keep in each currency?
Match your currency balances to what you expect to spend.
If you keep too much money in a foreign currency, you take on more exchange-rate risk. And if that currency drops against your home currency, your buying power can shrink.
A multi-currency account works best for short-term spending and transfers, not long-term savings. A simple rule of thumb is to keep only what you expect to use soon, plus about $100–$200 in local cash for your current destination.
What happens if my card charges a currency balance I don’t have?
If you make a card purchase in a currency where your balance is too low, the platform will usually convert the shortfall for you automatically using money from another balance you hold.
That can help prevent a declined payment, which is handy when you’re checking out or paying on the go. But there’s a tradeoff: it will usually trigger a currency conversion and may come with a small, transparent fee.
If you want to keep surprise charges to a minimum, it’s smart to hold enough money in the currencies you expect to use.
Can I use one setup for both personal and business payments?
It’s usually not a good idea. Most experienced nomads keep personal and business money separate. It makes invoicing easier, keeps tax reporting cleaner, and helps with compliance.
If you want to use Wise for both, route work income through a Wise business account and keep a separate personal account for day-to-day spending. Some freelancers go a step further and run business activity through an LLC while keeping personal funds in a different account.
